Making kefir at home is a fantastic way to incorporate probiotics into your diet. This fermented milk drink is not only delicious but also offers numerous health benefits. If you’re new to kefir, don’t worry – it’s surprisingly easy to make at home! In this article, we will guide you through the process of making kefir from scratch and provide tips and tricks for a successful batch every time.
What is Kefir?
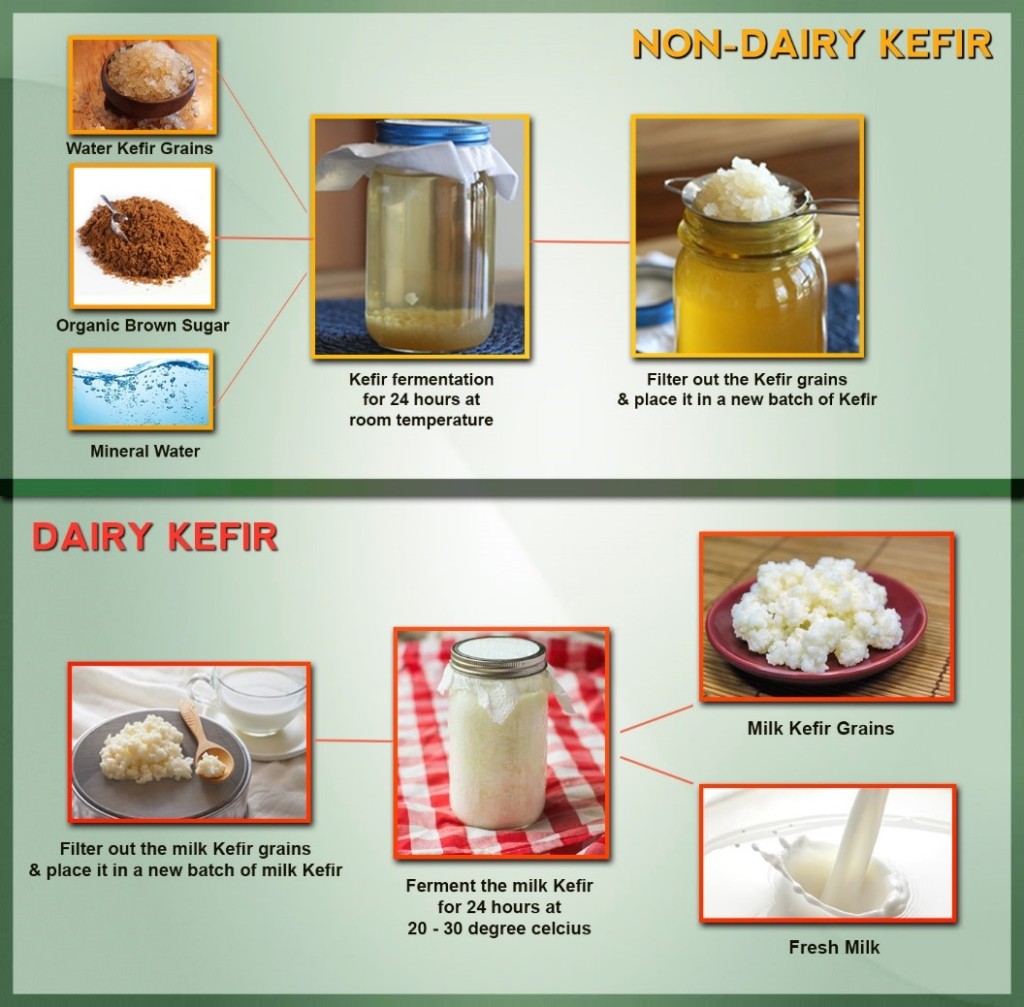
Kefir originates from the Caucasus Mountains and has been consumed for centuries due to its health-boosting properties. It is made by fermenting milk with kefir grains, which are small clusters of bacteria and yeast that resemble cauliflower florets. The fermentation process breaks down lactose in the milk, making it suitable for those who are lactose intolerant.
Why Make Kefir at Home?
Although kefir can be found in most supermarkets these days, making it at home ensures freshness and allows you to control the ingredients used. Additionally, homemade kefir tends to have a higher concentration of beneficial bacteria compared to store-bought varieties since commercial brands may pasteurize or strain out some of the healthy microorganisms.
Getting Started:
To make kefir at home, you’ll need a few essential items:
1. Kefir Grains: These can be purchased online or obtained from someone who already makes kefir.
2. Milk: You can use cow’s milk, goat’s milk, or even plant-based alternatives like coconut or almond milk.
3. A Glass Jar: Make sure it has enough capacity for both the liquid and grains.
4. A Non-Metal Stirring Utensil: Metal can react with the acids produced during fermentation.
The Process:
1. Add one tablespoon of kefir grains into your glass jar.
2. Pour two cups of fresh milk over the grains until they are fully submerged.
3. Cover the jar with a breathable cloth or coffee filter secured with a rubber band. This allows air to circulate while keeping out contaminants.
4. Place the jar in a warm spot, away from direct sunlight. The ideal temperature for fermentation is between 68-85°F (20-30°C).
5. Leave the mixture undisturbed for 24-48 hours, depending on your desired taste and texture. The longer it ferments, the tangier and thicker it will become.
6. Once fermented to your liking, gently strain out the kefir grains using a plastic sieve or strainer.
7. Transfer the strained liquid into another container for storage in the refrigerator.
Tips and Tricks:
1. Don’t use metal utensils when handling kefir or kefir grains as they may react with acids produced during fermentation.
2. It’s essential to maintain cleanliness throughout the process to avoid contamination by harmful bacteria.
3. If you’re not ready to make more kefir immediately, store your grains in milk in an airtight container in the refrigerator for up to two weeks.
4. Experiment with different types of milk to find your preferred flavor profile – each variety will yield slightly different results.
Flavoring Your Kefir:
Kefir can be enjoyed plain or customized according to personal preference by adding various flavors and ingredients:
1. Fruits: Blend fresh or frozen fruits like berries, mangoes, bananas, or peaches with your kefir for a fruity twist.
2. Sweeteners: Add natural sweeteners such as honey, maple syrup, or agave nectar if you prefer a sweeter taste.
3. Spices: Enhance your kefir’s flavor profile by incorporating spices like cinnamon, vanilla extract, cardamom powder, or even cocoa powder.
Incorporating Kefir Into Your Diet:
Now that you have homemade kefir at hand let’s explore some ways to incorporate it into your daily routine:
1. Smoothies: Use kefir as a base for your favorite smoothie recipes instead of milk or yogurt.
2. Salad Dressings: Add a tangy kick to your salad dressings by mixing kefir with herbs, lemon juice, and olive oil.
3. Overnight Oats: Replace some or all of the liquid in your overnight oats recipe with kefir for added creaminess and probiotic benefits.
4. Baking: Substitute kefir for buttermilk or regular milk in baked goods like pancakes, muffins, or bread.
Conclusion:
Making kefir at home is an enjoyable and rewarding process that allows you to reap the numerous health benefits of this fermented drink. With just a few simple ingredients and steps, you can enjoy fresh, flavorful kefir that’s tailored to your preferences. So why not give it a try? Start making your own homemade kefir today and embark on a journey towards better gut health!
Leave a Reply