Making Homemade Kefir on a Budget: Your Ultimate Guide
Are you looking to incorporate the probiotic-rich goodness of kefir into your diet without breaking the bank? Look no further! In this comprehensive guide, we’ll explore how you can make homemade kefir on a budget. From sourcing affordable ingredients to choosing the right equipment, we’ve got you covered. So let’s dive in and start fermenting!
1. What is Kefir?
Kefir is a fermented milk drink that originated in the Caucasus Mountains centuries ago. It is made by fermenting milk with kefir grains, which are small clusters of bacteria and yeast cultures resembling cauliflower florets. This fermentation process results in a tangy, slightly fizzy beverage packed with probiotics.
2. Why Make Homemade Kefir?
While store-bought kefir is readily available, making it at home has several advantages. Firstly, homemade kefir allows you to control the quality of ingredients used and ensure freshness. Additionally, it gives you the freedom to experiment with flavors and adjust fermentation times to suit your taste preferences.
3. Sourcing Affordable Ingredients
To make homemade kefir on a budget, finding affordable yet high-quality ingredients is key:
a) Milk: Opt for whole milk as it produces creamier and thicker kefir compared to low-fat or skim milk varieties. Consider buying milk in larger quantities or look out for deals at local farmers’ markets or grocery stores.
b) Kefir Grains: Rather than purchasing expensive pre-packaged kefir grains, consider obtaining them from local community groups or online platforms where enthusiasts share their excess grains for free or at minimal charges.
4. Choosing the Right Equipment
Making homemade kefir requires some basic equipment:
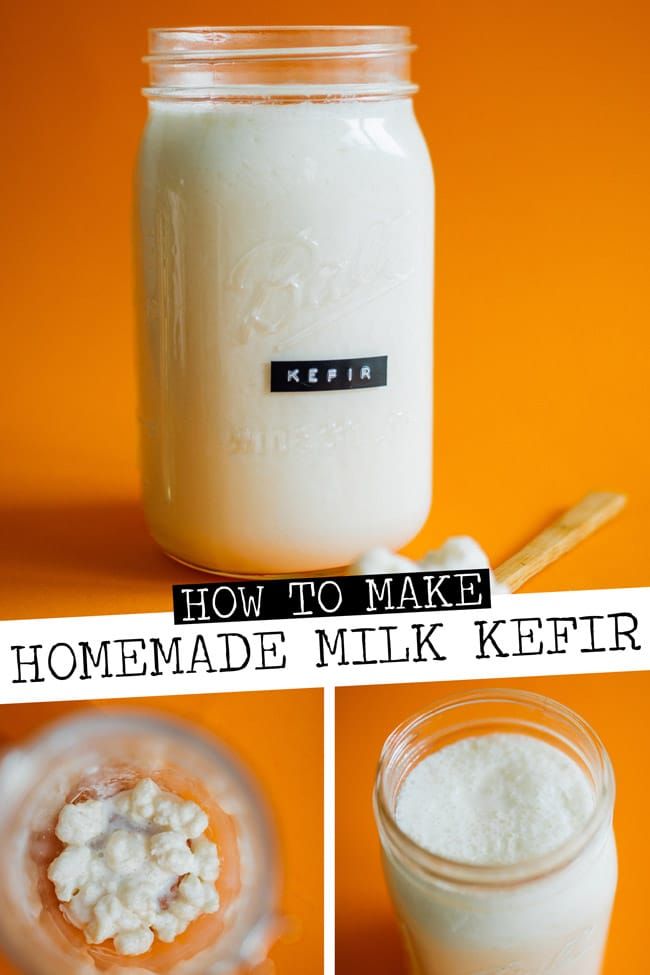
a) Glass Jar: Select a glass jar with a capacity of approximately one quart (1 liter). Avoid using metal containers as they may react with acids produced during fermentation.
b) Breathable Cover: Use a breathable cover, such as cheesecloth or coffee filter, to allow airflow while preventing contaminants from entering the jar. Secure it with a rubber band.
c) Strainer: A plastic or stainless steel strainer will be needed to separate the kefir grains from the finished product.
5. The Fermentation Process
Now that you have your ingredients and equipment ready, let’s delve into the fermentation process:
a) Add Milk and Kefir Grains: Pour one quart (1 liter) of milk into the glass jar and add approximately 2 tablespoons of kefir grains. Ensure that the grains are fully submerged in milk.
b) Allow Fermentation: Cover the jar with a breathable cover and place it in a warm spot away from direct sunlight. Let it ferment for about 24 to 48 hours. The longer it ferments, the tangier and thicker your kefir will become.
c) Strain Kefir Grains: After fermentation, gently stir the mixture to separate kefir grains from liquid. Place them in another clean jar for future use or share them with fellow kefir enthusiasts!
d) Store Your Kefir: Transfer your strained kefir into a sealable container and refrigerate until chilled before consumption. It can last up to two weeks if stored properly.
6. Flavoring Homemade Kefir
One of the perks of making homemade kefir is personalizing its flavor profile:
a) Plain Kefir: Enjoying plain kefir allows you to savor its natural tanginess and probiotic benefits without any additional flavors.
b) Fruity Delight: Blend fresh or frozen fruits like berries, mangoes, or peaches with plain kefir for a refreshing fruity twist. You can also add some honey or maple syrup as natural sweeteners if desired.
c) Spiced Infusion: Experiment by adding spices like cinnamon, nutmeg, or cardamom to your kefir. These spices lend a warm and cozy flavor profile.
d) Savory Kefir: Blend kefir with herbs like dill, basil, or mint to create a savory dip or dressing for salads.
Remember to experiment with small batches first to find your preferred flavor combinations!
7. Caring for Your Kefir Grains
To ensure the longevity of your kefir grains and avoid frequent purchases, proper care is essential:
a) Regular Fermentation: After straining the kefir grains from the finished product, place them in fresh milk immediately for their next fermentation cycle. This keeps them active and healthy.
b) Rest Periods: If you need a break from making kefir regularly, you can store the grains in milk in an airtight container in the refrigerator. Change the milk every 1-2 weeks to provide nutrients to keep them alive during this resting phase.
c) Sharing Is Caring: As your kefir grains multiply over time, consider sharing them with friends or family who are interested in making homemade kefir as well.
8. Troubleshooting Common Issues
a) Separation: Sometimes, homemade kefir may separate into curds and whey due to temperature fluctuations or over-fermentation. Simply give it a gentle stir before consuming; it is still safe and delicious!
b) Grain Health: If your grains stop fermenting properly or develop an unusual odor or color change, it could indicate contamination. In such cases, discard those particular grains and start afresh with new ones.
9. Final Thoughts
Making homemade kefir on a budget is not only cost-effective but also allows you full control over ingredients and flavors while reaping all its probiotic benefits. With some patience and experimentation, you’ll soon be sipping on deliciously tangy glasses of homemade goodness! So why wait? Start brewing today!
Leave a Reply